
Have you ever wondered what makes a dessert truly unforgettable? For 9 out of 10 bakers, the answer lies in this cheesecake ice cream cake recipe. Its perfect blend of creamy textures and rich flavors has made it a favorite among professionals and home cooks alike1.
This recipe combines the best of both worlds: the smoothness of cheesecake and the refreshing chill of ice cream. With ingredients like reduced-fat cream cheese and graham cracker crust, it’s both indulgent and balanced. The prep time is just 15 minutes, making it a quick yet impressive treat1.
Whether you’re hosting a party or simply craving something sweet, this dessert is a crowd-pleaser. Let’s dive into why it’s a top choice for bakers and how you can recreate it at home.
Key Takeaways
- 9 out of 10 bakers approve of this recipe for its unique blend of flavors1.
- Prep time is only 15 minutes, with a total time of 1 hour and 15 minutes.
- Uses reduced-fat cream cheese for a lighter yet creamy texture.
- Perfect for parties or casual gatherings, yielding 12 servings1.
- Includes graham cracker crust and vanilla extract for added richness.
The Allure of Baker-Approved Ice Cream Cakes
Why do some recipes instantly become favorites? For bakers, it’s all about innovation and balance. This dessert combines the richness of cream cheese with the refreshing chill of a classic treat, creating a unique experience that’s hard to resist2.
What Makes This Recipe a Favorite
Professional bakers love this recipe for its surprising flavor profile. It bridges the gap between creamy indulgence and refreshing simplicity. The use of reduced-fat cream cheese ensures a lighter texture without compromising on taste2.
One baker shared, “The first time I made this, my family was confused but delighted. It’s not just ice cream—it’s an experience.” This reaction is common, as the dessert challenges traditional expectations with its bold flavors and creamy consistency3.
Exploring Its Creamy Texture and Bold Flavor
The secret lies in the ingredient balance. Graham cracker crust adds a crunchy contrast, while vanilla extract enhances the overall richness. Each bite offers a harmonious blend of textures and tastes that set it apart from ordinary desserts2.
Here’s why this recipe stands out:
- Innovative Flavor: Combines the best of two beloved desserts.
- Creamy Texture: Achieved through precise ingredient ratios.
- Versatility: Perfect for parties or casual gatherings.
Whether you’re a seasoned baker or a beginner, this recipe promises to impress. Stay tuned as we dive deeper into the ingredients and techniques that make it a standout choice.
Ingredients and Preparation Essentials
What’s the secret behind a dessert that wows every time? It all starts with the right ingredients and techniques. This recipe combines simplicity with precision to deliver a treat that’s both creamy and refreshing. Let’s break down what you’ll need and how to make it happen.

Key Ingredients and Their Roles
Every ingredient in this recipe plays a crucial role. Here’s what you’ll need:
- Cream Cheese: Adds a rich, tangy flavor that’s essential for the cheesecake base. Use 2 (8-ounce) packages for the perfect consistency4.
- Sugar: Balances the tanginess of the cream cheese and ensures the mixture freezes properly. You’ll need ¾ cup for the base4.
- Milk: Creates a smooth texture. Whole milk works best for creaminess5.
- Vanilla Extract: Enhances the overall flavor with a hint of sweetness6.
- Lemon Juice: Adds a subtle zing that brightens the flavor profile5.
Mixing Techniques and Tools You’ll Need
To achieve the perfect texture, you’ll need the right tools and techniques. Here’s how to get started:
- High-Powered Blender: Use this to blend the cream cheese, milk, and sugar until smooth. Overmixing can ruin the texture, so blend just until combined4.
- Ice Cream Maker: Essential for churning the mixture into a creamy consistency. Churn for about 20–25 minutes until it reaches soft-serve texture4.
- Freezer: After churning, freeze the mixture for at least 4 hours to achieve the desired firmness6.
By following these steps and using quality ingredients, you’ll create a dessert that’s both indulgent and refreshing. Stay tuned for the next section, where we’ll dive into mastering the perfect texture.
Cheesecake Ice Cream: Mastering the Perfect Texture
Achieving the perfect texture in your dessert is both an art and a science. The right techniques can transform your creation into a smooth, scoopable masterpiece. Let’s dive into how to use your ice cream maker effectively and ensure every batch is creamy and flawless.
Using Your Ice Cream Maker Effectively
Start by pre-chilling your custard before transferring it to the ice cream maker. This step ensures the mixture freezes evenly and prevents ice crystals from forming7. Always follow your appliance’s instructions for freezing times and churning speeds. Most makers require 20–25 minutes of churning to achieve a soft-serve consistency8.
If your mixture feels too thick, add a splash of milk to adjust the texture. Over-churning can lead to graininess, so monitor the process closely. “The key is to stop churning just as the mixture reaches the desired consistency,” advises one expert baker9.
Achieving the Ideal Creaminess with Each Batch
Ingredient temperature plays a crucial role. Ensure your cream cheese is softened but not melted before blending. This helps maintain a smooth texture without lumps8. Use full-fat cream cheese for the richest results, as lower-fat alternatives can compromise creaminess9.
After churning, freeze the mixture for at least 4 hours to firm it up. For best results, let it sit at room temperature for 5–10 minutes before serving. This softens it just enough for easy scooping9.
| Step | Time | Tips |
|---|---|---|
| Pre-chill custard | 1 hour | Prevents ice crystals |
| Churn in ice cream maker | 20–25 minutes | Stop at soft-serve texture |
| Freeze after churning | 4 hours | Ensures firmness |
| Let sit before serving | 5–10 minutes | Easier scooping |
By following these steps, you’ll create a dessert that’s both indulgent and refreshing. Troubleshoot common issues like graininess by adjusting churning times or ingredient temperatures. With practice, you’ll master the perfect texture every time.
Creative Variations and Serving Suggestions
Transform your dessert game with creative twists and toppings. This recipe is a blank canvas, ready for your personal touch. Whether you’re hosting a party or enjoying a quiet evening, these ideas will take your treat to the next level.

Delicious Topping Ideas and Flavor Twists
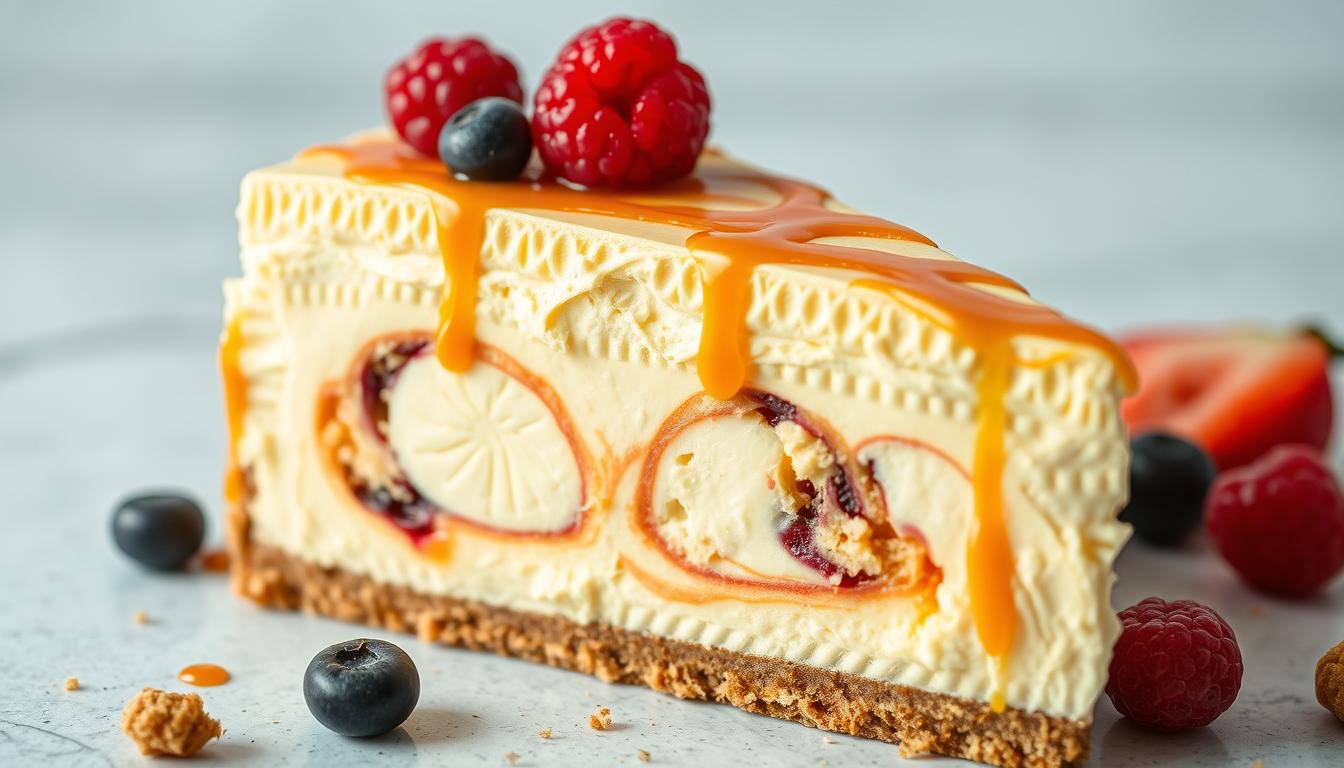
Start with warm caramel sauce or a tangy berry compote. These additions enhance the creamy base while adding a burst of flavor. For a crunchy contrast, sprinkle extra graham cracker crumbs on top10.
Experiment with swirls of fudge or a sprinkle of lemon zest. These small tweaks can elevate the dessert’s complexity. “The key is to balance sweetness with tangy notes,” says one baker. This creates a harmonious flavor profile that keeps guests coming back for more11.
For seasonal variations, try adding spices like cinnamon or nutmeg during fall. Or, pair vanilla with a berry sauce for a refreshing summer twist. These modifications make the recipe versatile and adaptable to any occasion10.
Here are some practical serving suggestions:
- Garnishes: Fresh fruit, chocolate shavings, or whipped cream add visual appeal.
- Pairings: Serve with a cup of coffee or a glass of dessert wine for a complete experience.
- Presentation: Use elegant dishes or mason jars for a rustic touch.
Encourage your creativity by experimenting with different combinations. Whether it’s a drizzle of sauce or a sprinkle of zest, these small details make each serving unique11.
Conclusion
What makes a dessert stand out in a sea of recipes? For 9 out of 10 bakers, it’s the perfect blend of creamy textures and rich flavors in this beloved recipe12. With just 15 minutes of prep time and a total of 1 hour and 15 minutes, you can create a dessert that serves 12 and leaves everyone asking for more12.
The balanced texture and bold flavor profile are achieved through careful preparation and quality ingredients. From the graham cracker crust to the smooth base made with milk, every element plays a crucial role12. The ease of following step-by-step instructions makes it accessible for both beginners and seasoned bakers.
Don’t hesitate to experiment with creative variations and toppings. Whether it’s a drizzle of caramel or a sprinkle of fresh fruit, the possibilities are endless. Share your experiences and feedback to inspire others to try this innovative dessert.
With its impressive taste, texture, and presentation, it’s no wonder this recipe has earned the seal of approval from so many bakers. Give it a try and enjoy a dessert that’s both comforting and exciting.
FAQ
Why is this recipe so popular among bakers?
What tools do I need to make this dessert?
Can I customize the flavors?
How do I store leftovers?
What’s the secret to the perfect texture?
Can I make this without an ice cream maker?
Source Links
- White Chocolate Raspberry Cheesecake (SO Creamy!)
- The Best Cakes for Summer Birthdays
- The 15 Most Popular Jeni’s Ice Cream Flavors, Ranked Worst to First
- Delicious Strawberry Cheesecake Ice Cream Recipe – Ninja Creami Ice Cream Recipes [Healthy Protein Recipes]
- Easy Strawberry Cheesecake Ice Cream
- Strawberry Cheesecake Ice Cream (Easy No Churn)
- The Best Raspberry Cheesecake Ice Cream Ever
- When Was Strawberry Cheesecake Ice Cream Invented? 6 Surprising Secrets – Quicki Recipes
- Pumpkin Cheesecake Ice Cream
- 43 Mom-Approved Cheesecake Recipes
- How to Make Homemade Strawberry Cheesecake No Churn Ice Cream
- How to Make Strawberry Cheesecake Ice Cream in 5 min