
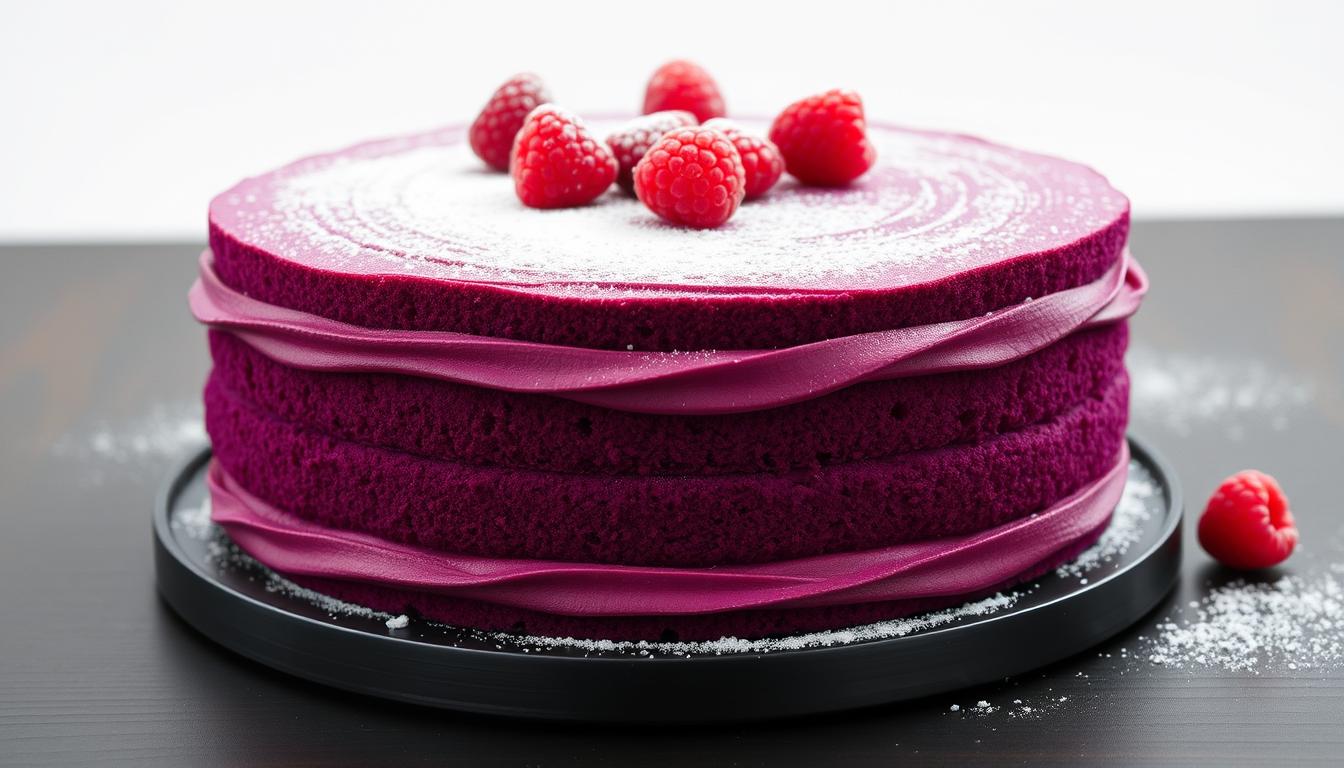
Are you ready to create a show-stopping dessert that’s as vibrant as it is delicious? This recipe takes the classic red velvet cake and gives it a bold, modern twist. With its rich flavor and stunning color, it’s perfect for birthdays, celebrations, or simply indulging your sweet tooth. Let’s dive into the ultimate guide to making this eye-catching treat.
This dessert combines the moist, tender texture of traditional velvet cake with a unique purple hue. The secret lies in the precise use of food coloring and a carefully balanced mix of ingredients like buttermilk and cocoa powder. Whether you’re a baking novice or a seasoned pro, this step-by-step guide will help you achieve bakery-quality results at home1.
From prepping your pans to mastering the perfect frosting, every detail is covered. You’ll learn how to avoid common pitfalls like overmixing and uneven baking. Plus, we’ll share tips for enhancing the flavor and presentation to make your creation truly unforgettable2.
Key Takeaways
- Learn the step-by-step process to create a vibrant and moist dessert Purple Velvet Cake
- Discover how to achieve the perfect color with precise food coloring techniques.
- Understand the role of key ingredients like buttermilk and cocoa powder.
- Get tips for avoiding common baking mistakes.
- Explore creative ways to decorate and serve your masterpiece.
Introduction to a Vibrant Dessert Experience
Uncover the inspiration that transformed a classic recipe
into a colorful masterpiece. This dessert draws from the rich history of traditional velvet cakes, blending timeless techniques with modern creativity. Its vibrant hue and rich flavor make it a standout choice for any occasion3.
What Inspired This Recipe?
The original red velvet cake served as the foundation for this innovative twist. By introducing bold colors and unique ingredients, this recipe offers a fresh take on a beloved classic. The use of high-quality butter and cream cheese enhances the flavor, creating a dessert that’s both indulgent and memorable4.
The Charm of Velvet Cakes
Velvet cakes are known for their soft, moist texture and subtle cocoa flavor. This recipe builds on that foundation, adding a creamy frosting that ties everything together. The combination of butter and cream cheese in the frosting creates a rich, tangy contrast that complements the cake perfectly5.
Frosting plays a crucial role in elevating the dessert’s appeal. Its smooth, velvety texture adds a luxurious finish, making every bite irresistible. Whether you’re a seasoned baker or just starting out, this recipe invites you to experiment with flavors and create something truly special.
What Makes This Cake Unique?
Discover the secrets behind a dessert that’s as bold in flavor as it is in appearance. This recipe takes the classic red velvet cake and transforms it into something extraordinary. The fusion of colors and flavors creates a treat that’s both visually striking and delicious6.
The Fusion of Flavors and Colors
At the heart of this dessert is the perfect balance between rich chocolate undertones and vibrant hues. A hint of cocoa powder adds depth, while precise food coloring techniques bring the color to life7. The result is a dessert that’s as pleasing to the eye as it is to the palate.
Color chemistry plays a crucial role in achieving the perfect shade. By carefully mixing red and purple food coloring, you can create a hue that’s both bold and inviting6. This attention to detail ensures every slice is a masterpiece.
The unique appeal of this dessert lies in its complementary elements. The creamy frosting enhances the moist texture, while the vibrant color adds a modern twist. Together, they create a baking experience that’s truly one-of-a-kind7.
Gathering Your Essential Ingredients
To craft a dessert that’s both visually stunning and irresistibly moist, start by gathering the right ingredients. Each component plays a crucial role in achieving the perfect texture, flavor, and color. Let’s break down what you’ll need and why these ingredients matter.
Dry Ingredients and Their Role
Flour is the foundation of your recipe, providing structure and stability. Use all-purpose flour for the best results, measuring it accurately to avoid a dense or crumbly texture8.
Sugar not only sweetens but also helps retain moisture, ensuring a tender crumb. Granulated white sugar works best for this recipe9.
Cocoa powder adds a subtle chocolate flavor and enhances the dessert’s richness. Natural cocoa powder is recommended to maintain the right acidity and color8.
Wet Ingredients and Mixing Essentials
Buttermilk is a game-changer, contributing to the dessert’s moistness and tenderness. Its acidity also reacts with baking soda, creating a fluffy texture8.
Eggs bind the ingredients together, while vegetable oil adds moisture and richness. A touch of vinegar enhances the buttermilk’s effect, ensuring a light and airy result9.
- Measure dry ingredients like flour and sugar precisely for consistent results.
- Use natural cocoa powder to maintain the right flavor and acidity.
- Buttermilk is essential for moisture and a tender crumb.
- Combine wet ingredients thoroughly to ensure even mixing.
Prepping Your Kitchen and Equipment
Setting up your kitchen for baking success starts with the right tools and preparation. A well-organized workspace ensures a smooth process and perfect results. Let’s walk through the essential steps to get everything ready before you begin.
Choosing the Right Cake Pan
Selecting the correct cake pan is crucial for even baking and easy removal. An 8 or 9-inch pan is ideal for this recipe10. Non-stick pans are recommended, but greasing and lining are still necessary to prevent sticking.
Dusting your pan with cocoa powder instead of flour can avoid noticeable residue and enhance the flavor11. This technique ensures a clean finish and complements the dessert’s rich taste.
Greasing and Lining Techniques
Properly greasing your pan is essential to prevent the dessert from sticking. Use butter or cooking spray to coat the surface evenly. Lining the bottom with parchment paper adds an extra layer of protection.
For best results, ensure the parchment paper fits snugly. This step makes it easier to remove the baked layers without breaking them.
Using the Correct Bowls and Tools
Choosing the right bowl sizes and mixing tools ensures better consistency. Large mixing bowls are ideal for combining dry and wet ingredients thoroughly. Use a whisk or electric mixer for even blending.
Having all your tools and ingredients ready minimizes stress during the baking process. This preparation ensures you can focus on achieving the perfect texture and flavor.
| Pan Type | Benefits | Best Use |
|---|---|---|
| Non-Stick | Easy release, minimal greasing | General baking |
| Glass | Even heat distribution | Longer baking times |
| Aluminum | Lightweight, durable | Quick baking |
By following these steps, you’ll create a stress-free baking environment. Proper preparation ensures every ingredient and tool is ready, setting the stage for a flawless result.
Creating the Perfect Purple Hue
Achieving the perfect color for your dessert is both an art and a science. The vibrant shade you’re aiming for requires precision and attention to detail. By mastering the right techniques, you can create a hue that’s both bold and inviting.
Food Coloring Techniques for Vibrancy
Start by using purple gel food coloring for the most intense results. Gel-based options are more concentrated than liquid, allowing you to achieve a rich color without altering the texture of your batter12. Begin with a small amount, such as 1 teaspoon, and gradually add more until you reach the desired shade.
Mix the coloring into your wet ingredients, like buttermilk or vegetable oil, before combining them with the dry components. This ensures even distribution and prevents streaks13. Stir thoroughly to create a consistent hue throughout the batter.
Balancing Purple with White for a Lighter Tone
If you prefer a softer, pastel-like tone, consider adding a touch of white food coloring. This helps to lighten the shade while maintaining the overall vibrancy. Start with a small amount, such as 1/2 teaspoon, and adjust as needed12.
Experiment with different ratios to find the perfect balance. A lighter tone can add elegance to your dessert, making it suitable for various occasions. Remember, less is often more when working with food coloring.
By following these steps, you’ll master the art of creating a stunning and visually appealing dessert. The right color can elevate your creation, making it as beautiful as it is delicious.
Crafting the Ideal Cake Batter
Mastering the art of creating a smooth, lump-free batter is the foundation of any great dessert. The way you combine your ingredients and the techniques you use can make all the difference. Let’s dive into the steps to achieve a silky, perfectly blended batter every time.

Mixing Methods for a Smooth Texture
Start by ensuring all your ingredients are at room temperature. This is especially important for eggs and butter, as they blend more easily, creating a smoother texture14. Cold ingredients can lead to lumps and uneven mixing.
Begin by combining your dry ingredients in a large bowl. Sift the flour, baking powder, and salt to remove any clumps. In a separate bowl, cream the butter and sugar until light and fluffy. Gradually add the eggs, one at a time, mixing well after each addition15.
Next, alternate adding the dry ingredients and wet ingredients, such as buttermilk or milk, to the butter mixture. This method prevents over-mixing, which can result in a dense texture. Finish by folding in the vanilla extract for a rich, aromatic flavor14.
| Step | Ingredient | Purpose |
|---|---|---|
| 1 | Dry Ingredients | Provides structure |
| 2 | Butter & Sugar | Adds moisture and sweetness |
| 3 | Eggs | Binds the batter |
| 4 | Vanilla | Enhances flavor |
By following these steps, you’ll create a batter that’s smooth, consistent, and ready to bake. Remember, patience and precision are key to achieving the perfect texture and flavor.
Baking the Cake to Perfection
Achieving the perfect bake requires precision and attention to detail. The right oven settings and timing are crucial for a moist, evenly baked dessert. Start by preheating your oven to 350°F (175°C) to ensure consistent heat distribution13.
Once the oven is ready, place your prepared pans on the center rack. This position allows for even baking and prevents over-browning. Set a timer for 25 minutes, but begin checking for doneness at the 20-minute mark6.
Oven Settings and Timing Tips
Preheating is essential for activating the leavening agents, like baking soda, which helps the dessert rise properly7. Without it, your bake may turn out dense or uneven. Always allow the oven to reach the desired temperature before placing your pans inside.
Monitor the bake closely during the final minutes. Insert a toothpick into the center; if it comes out clean, your dessert is ready. Overbaking can dry it out, so timing is critical13.
- Preheat the oven to 350°F for consistent results.
- Check for doneness starting at the 20-minute mark.
- Use a toothpick to test the center for moist crumbs.
- Allow the dessert to cool in the pan for 10 minutes before transferring6.
By following these steps, you’ll achieve a perfectly baked dessert every time. Precision in timing and temperature ensures a moist, tender result that’s sure to impress.
Purple Velvet Cake: A Step-by-Step Guide
Building a stunning dessert requires careful layering and precision. Start by ensuring your baked layers are completely cooled. This prevents the frosting from melting and ensures clean, even stacking16.
Place the first layer on a cake stand or plate. Spread a generous amount of cream cheese frosting evenly over the top. Use an offset spatula for smooth application, ensuring the edges are covered17.
Add the second layer, pressing gently to secure it. Repeat the frosting process, ensuring each layer is aligned for a balanced look. This step-by-step approach ensures a cohesive and visually appealing dessert16.
For the final layer, apply a thin coat of frosting as a crumb coat. This seals in crumbs and creates a smooth base for the final frosting layer. Chill the dessert for 15 minutes before adding the final coat17.
Once assembled, use a spatula or cake scraper to create a polished finish. The cream cheese frosting not only enhances flavor but also adds moisture, making every bite irresistible16.
By following these steps, you’ll achieve a professional-quality dessert that’s as beautiful as it is delicious. The careful layering and frosting techniques ensure a cohesive and stunning result.
Making the Decadent White Chocolate Cream Cheese Frosting
Crafting a luxurious frosting is the key to elevating your dessert to the next level. This white chocolate cream cheese frosting combines rich flavors with a velvety texture, making it the perfect complement to your baked creation. Let’s dive into the techniques that ensure a smooth and creamy result every time.

Melting and Blending Techniques
Start by melting the white chocolate using a double boiler. This method ensures a controlled process, preventing overheating and maintaining a smooth consistency18. Combine the melted chocolate with room-temperature cream cheese and unsalted butter for seamless blending19.
Use an electric mixer to beat the ingredients until they are fully incorporated. This step ensures a creamy texture and avoids any graininess20. Gradually add sifted confectioners’ sugar and vanilla extract for sweetness and flavor enhancement18.
Maintaining a Creamy Texture
To keep your frosting soft and spreadable, ensure all ingredients are at room temperature before mixing19. This prevents lumps and ensures even blending. Avoid overmixing, as it can lead to a dense texture20.
If the frosting becomes too thick, add a teaspoon of milk or cream to adjust the consistency. For a lighter tone, consider adding a touch of white food coloring18.
| Ingredient | Quantity | Purpose |
|---|---|---|
| White Chocolate | 114 grams | Adds richness |
| Cream Cheese | 227 grams | Provides tanginess |
| Unsalted Butter | 114 grams | Ensures smoothness |
| Confectioners’ Sugar | 480 grams | Sweetens and thickens |
| Vanilla Extract | 1 teaspoon | Enhances flavor |
By following these steps, you’ll create a frosting that’s both decadent and versatile. Its creamy texture and rich flavor make it the perfect finishing touch for your dessert masterpiece.
Assembling the Cake Layers for a Stunning Presentation
Assembling your dessert with precision ensures a professional and visually stunning result. The key lies in even layering, a smooth crumb coat, and careful final assembly. These techniques not only enhance the appearance but also ensure every slice is perfect.
Layering Techniques for Even Distribution
Start by placing the first layer on a cake stand. Spread a generous amount of frosting evenly using an offset spatula. This ensures the velvet texture remains intact and the layers stay moist21.
Add the second layer, pressing gently to align it. Repeat the frosting process, making sure each cup of frosting is distributed evenly. This step prevents gaps and ensures a balanced structure22.
Crumb Coating and Final Assembly
Apply a thin crumb coat to seal in any loose crumbs. This step is crucial for a smooth finish. Chill the dessert for 15-20 minutes to set the buttercream21.
Once chilled, add the final layer of frosting. Use a cake scraper for a polished look. The baking soda in the batter ensures the layers rise evenly, making assembly easier22.
By following these steps, you’ll create a dessert that’s as beautiful as it is delicious. The right techniques ensure a professional-quality result every time.
Decorating and Personalizing Your Masterpiece
Transform your dessert into a visual masterpiece with creative and simple decoration ideas. The right techniques can elevate its appearance, making it a centerpiece for any occasion. From edible glitter to fresh fruit accents, these tips will help you achieve a stunning result.
Simple Decoration Ideas to Enhance Visual Appeal
Start by using edible glitter to add a touch of sparkle. This works especially well for celebrations, creating a festive look23. Pair it with fresh fruit like berries or citrus slices for a vibrant, natural accent.
For a more elegant touch, consider edible gold leaf. It adds a luxurious finish and pairs beautifully with pastel hues23. You can also use fondant flowers to create a whimsical, garden-inspired design.
Temperature plays a key role in applying decorations. Ensure your dessert is at room temperature before adding delicate details like white chocolate lace or sugar pearls. This prevents melting and ensures a clean finish24.
Adapt classic red velvet decoration styles to suit modern purple hues. Use subtle accents of purple food coloring in your frosting or drizzle for a cohesive look25. This ties the design together while maintaining its unique appeal.
Finally, experiment with layered textures and color gradients. Ombre designs fading from deep purple to pale lavender can capture the essence of blooming lilacs23. These techniques add depth and visual interest to your creation.
By following these tips, you’ll create a dessert that’s as beautiful as it is delicious. The right decorations can turn a simple bake into a show-stopping masterpiece.
Troubleshooting Common Baking Issues
Even the most experienced bakers can encounter challenges when creating a vibrant and moist dessert. Whether it’s achieving the perfect color or ensuring the right texture, small adjustments can make a big difference. Here’s how to address common issues and keep your baking process smooth and successful.
Achieving the Right Color Intensity
If your dessert’s color isn’t as vibrant as expected, it’s often due to the type or amount of food coloring used. Gel-based options are more concentrated than liquid, allowing for a richer hue without altering the batter’s consistency26. Start with a small amount and gradually add more until you reach the desired shade.
For a natural alternative, consider using plant-based dyes like beetroot juice or anthocyanin. These can provide a similar hue while keeping your recipe free from artificial additives27. Always mix the coloring into wet ingredients first to ensure even distribution.
Maintaining Moisture and Texture
Dryness is a common issue, often caused by overbaking or incorrect ingredient ratios. To keep your dessert moist, ensure you’re using the right amount of buttermilk and vegetable oil26. Adding an extra tablespoon of buttermilk can enhance moisture without affecting the texture28.
Room conditions also play a role. If your kitchen is too dry, consider covering the baked layers with a damp cloth while they cool. This prevents them from drying out before assembly28.
| Issue | Solution |
|---|---|
| Uneven Color | Use gel-based food coloring or natural alternatives like beetroot juice2627. |
| Dry Texture | Add extra buttermilk or cover layers with a damp cloth while cooling2628. |
| Overbaking | Set a timer and check for doneness at the 20-minute mark26. |
By addressing these common challenges, you can ensure your dessert remains visually stunning and delicious. Small adjustments based on room conditions and ingredient variability can make all the difference in achieving bakery-quality results at home.
Conclusion
Creating a show-stopping dessert requires attention to detail and quality ingredients. From mixing the batter to perfecting the frosting, each step plays a crucial role in achieving a memorable result. Using unsalted butter ensures a rich, creamy texture, while cocoa powder adds depth to the flavor profile29.
Baking at 350°F (175°C) for 25-30 minutes ensures even cooking and a moist texture30. Cooling the layers before assembly prevents the frosting from melting, ensuring a clean finish. These small details make a big difference in the final product.
Feel free to experiment with natural colorings or different frosting styles to make the recipe your own. With the right techniques and ingredients, you can create a dessert that’s both visually stunning and delicious. Enjoy the process and savor the results!
FAQ
What inspired the creation of this vibrant dessert?
How do I achieve the perfect purple hue in the batter?
What’s the best way to ensure a smooth cake texture?
How do I prevent the cake from drying out during baking?
Can I substitute cream cheese frosting with another type?
What’s the secret to layering the cake evenly?
How do I store this cake to maintain its freshness?
Can I use natural ingredients for the purple color?
Source Links
get=”_blank” rel=”nofollow noopener”>Delicious Purple Velvet Cake Recipe – A Colorful Twist
-
/ol></li> </ol><p>li>href=”https://www.cakerecipehome.com/purple
-velvet-cake-recipes/” target=”_blank” rel=”nofollow noopener”>Purple Velvet Cake Recipes – Cake Recipe Home</a></li>
-
- <li>
Purple Velvet Cake with Cream Cheese Frosting – Recipes by Clare
- Purple Velvet Cake
- ref=”https://www.theflavorbender.com/red-velvet-cake-cream-cheese-frosting/” target=”_blank” rel=”nofollow noopener”>Red Velvet Cake with Cream Cheese Frosting
- Homemade Red Velvet Cake</a>
- <a
href=”https://hannahcooking.com/easy-purple-velvet-cake-recipe/” target=”_blank” rel=”nofollow noopener”>Delightful Purple Velvet Cake Recipe for Every Occasion
-
-
- data-type=”sources”>>ref=”https://gemsndjewels.com/
recipe/easy-purple <ol data-type=”sources”>
- -velvet-cake-recipe/” target=”_blank” rel=”nofollow noopen
-
er”>Easy Purple
- Velvet Cake Recipe – Gems and Jewels
- My mother took one bite and rushed over to me, seeking the recipe
- Finally. The Perfect Vanilla Cake Recipe. – Sugar & Sparrow
- href=”https://www.recipegirl.com/green-velvet-cheesecake-cake/” target=”_blank” rel=”nofollow noopener”>Green Velvet Cheesecake Cake</li>
- <a href=”https://www.dijafood.com/purple-velvet-cake-recipe/” target=”_blank” rel=”nofollow noopener”>Purple Velvet Cake Recipe: A Unique and Elegant Dessert
- nofollow noopener”>Purple Velvet Cake: A Mesmerizing Culinary Delight
- ef=”https://www.richestrecipes.com/how-to-make-a-purple-velvet-cake-guide/” target=”_blank” rel=”nofollow noopener”>How to Make the Best Purple Velvet Cake – Easy Recipe & Cream Cheese Frosting | Richest Recipes
- Silky White Chocolate Cream Cheese Frosting Recipe
- Moist White Velvet Cake with Cream Cheese Frosting
- Making a Galaxy Cake with Planet Decorations Tutorial – WarmOven Blog
- American Flag Cake
- 28 Spring Cake Decorating Ideas To Brighten Your Dessert Table
- How to Decorate a Cake
- How To Use Transfer Sheets For Confectionery Decoration</a>
- =”https://talesrecipe.com/easy-purple-velvet-cake-recipe-youll-love-to-bake/” target=”_blank” rel=”nofollow noopener”>Easy Purple Velvet Cake Recipe You’ll Love to Bake – Talesrecipe
- Baker confused about how to make red velvet cake without banned additive: ‘Cannot be tasted in the final result’</li>
- ref=”https://chefibpa.com/baking-blunders-12-common-mistakes-to-avoid/” target=”_blank” rel=”nofollow noopener”>Diploma in Baking: Baking Blunders to Avoid – A Guide for Students</li>
- rel=”nofollow noopener”>Purple Velvet Cake Recipe – A Unique Delight!
- <</li>
-
li>Purple Velvet Cake with White Chocolate Cream Cheese Frosting